


Introduction
With the Vergo app, adding receipts to your transactions and ensuring every detail is accounted for becomes a seamless process. In this tutorial, we'll walk you through how to add a receipt to a transaction using the Vergo app and ensure that your accounting team receives all the necessary information in real-time. Let's get started!
Introduction to the Vergo App
When you log into the Vergo app, you're greeted with an intuitive overview of all your tasks. The "To Do" section highlights transactions missing receipts and any additional coding necessary. While you can see all transactions within your account through the "All" tab, we will focus on transactions needing receipts today by working from the "To Do" section.
Navigating the Transaction Overview
Once you click on a specific transaction, you'll see a detailed overview of information retrieved from Visa, Mastercard, or Amex networks. This includes the transaction amount, date, and merchant. Moreover, you have access to various coding options directly from your ERP system, allowing you to assign codes, manage jobs, and more.
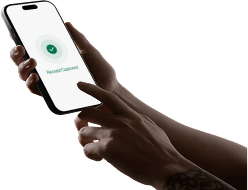
Adding a Receipt to a Transaction
Adding an image to a transaction is a straightforward process. Simply attach an image to the transaction, and it will be immediately bound. You can then update the transaction with additional information, such as memos, job searches, cost types, and account details. If the transaction is reimbursable, mark it as such to keep your account team informed. Once updates are made, the transaction is saved and updated across all platforms.
As your field team processes transactions, they can instantly add necessary details at the point of purchase, receiving real-time notifications to upload receipts and attachments. Once a transaction is complete, it will disappear from the "To Do" tab and reflect in the "All" tab with a receipt attached.
Verifying Data on the Dashboard
Your team can view real-time updates on the dashboard. By refreshing the account and navigating to the transaction tab, you will see transactions now enhanced with cost code information, receipts, and memos. Clicking into the tab allows a preview of receipts taken via mobile, ensuring your accounting team has all data in real-time.
Conclusion
By using the Vergo app, adding receipts and updating transaction details becomes more efficient, enabling your team to close their books faster with all necessary information at their fingertips. Today, we've explored using the Vergo app to streamline your expense management process by effortlessly adding a receipt to any transaction.
Make sure to engage with this feature on your next round of transactions, and experience how it simplifies your expense management today!
